|
2nd Nov 2009
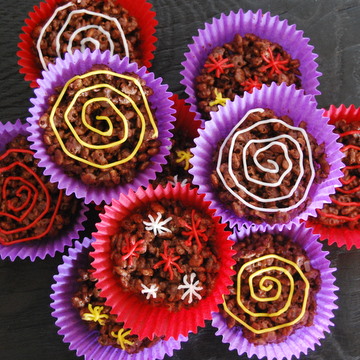
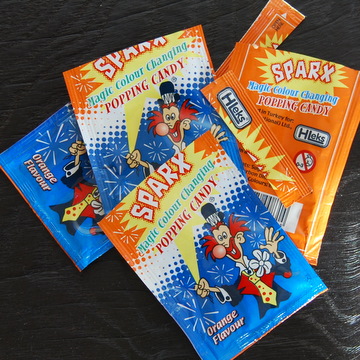
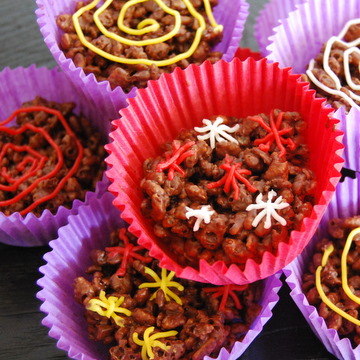
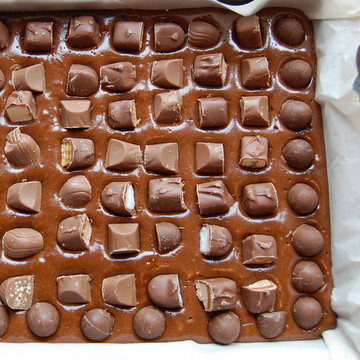
Tamsin: There is more than meets the eye or rather the ear when you bite into these chocolate crispies – a surprise that is perfect for Bonfire Night. A hidden ingredient, ‘space dust’ or ‘popping candy’ gives them an extra snap, crackle, pop and fizz. (Reminded me of the firecrackers, now banned, that we use to let off in the garden and watch as they jumped around perilously near us.)
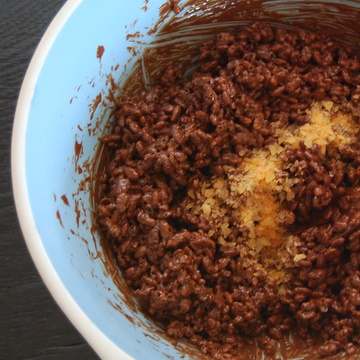
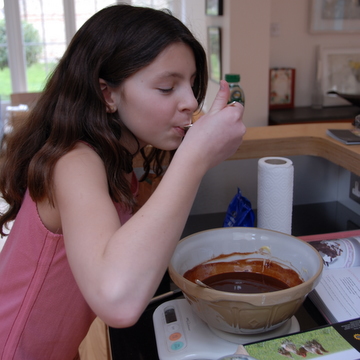
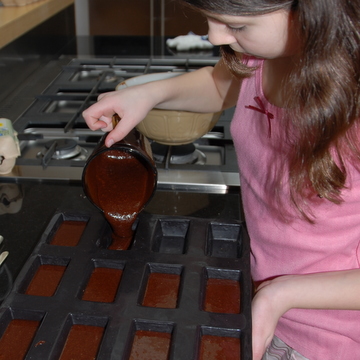
To make 12 of these firecrackers I melted 150g chocolate (milk or dark) and mixed in 175g Rice Krispies (or any other cereal of your choice). Leave the mixture to cool for just a few minutes, making sure that it does not start to harden, as the candy will start popping too early if put into a mixture that is wet or hot.
I then added 4 packets of popping candy which can be bought in an old-style sweetshop or from websites, and decorated them with some icing. They gave a pleasing popping sensation in the mouth, as long as you have the right technique when eating.
For best results crunch but also suck each mouthful and your tastebuds will fizzle and pop nicely.
5th Apr 2009
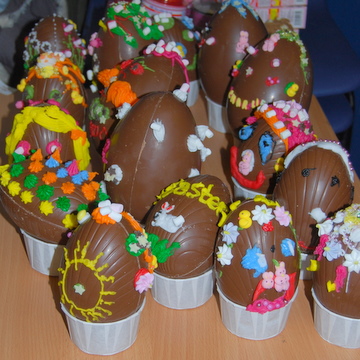
Tamsin: We had great fun at the chocolate evening organised to raise money for the school. The hall was packed and nearly all the chocolate in its various forms consumed. A big hit was the decorating Easter eggs with a colourful array soon adorning the tables. The chocolate games were also much liked and could be enjoyed by family and friends for some Easter fun.
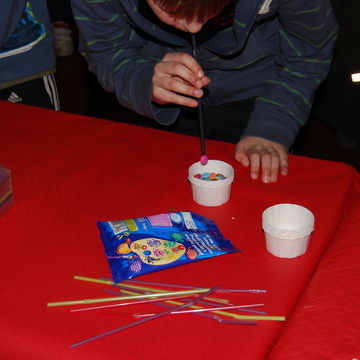
The first used Smarties, some straws and a container. The aim was to suck as many Smarties up using the straw and dropping them in the container as you could in 1 minute. The prize was the container of Smarties you managed to get. Most people got around 20, but some were nearer to 40!
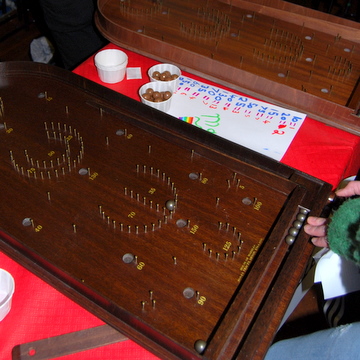
The second game used Maltesers and a bagatelle board. Each person had 10 marbles for the bagatelle and you got a Malteser for each one that scored on the board.
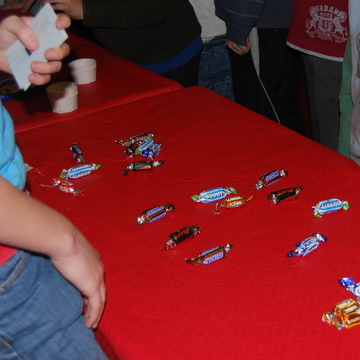
The third game required just a box of Celebrations or similar assorted chocolates. One of each type is placed on the table. Then one of them has to be chosen as the ‘stop’ chocolate. The person in charge of the game chooses this, making sure that the person who is going to play does not know the choice. The player then starts to pick up the chocolates in whatever order they wish to, keeping each chocolate until they pick up the ‘stop’ one which ends their turn. You either walk away with 0 or a handful of chocolates depending on your luck.
29th Mar 2009
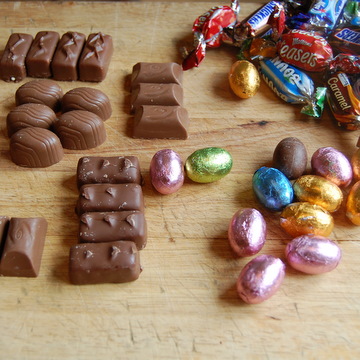
Jane: To make special customised Easter brownies, add some little eggs or chocolates (we used solid chocolate mini eggs and ’Celebrations’ chocs) to the recipe. It’s easy: make your normal brownie batch, then pour about a third of the mixture into the baking tin, place your eggs or chocolates in rows on top so each brownie will get a whole chocolate in the final cut portion, then pour over the rest of the mixture to cover completely. Cook as normal. Delicious...
And if you have wagonloads of chocolate around the house, use some up in this Triple Chocolate Brownie recipe, which has big chunks of milk and white chocolate in a rich dark chocolate base.
Triple Chocolate Brownies Ingredients 400g dark chocolate (70% cocoa solids) 550g unsalted butter 350g self-raising flour 1 tsp baking powder 650g golden caster sugar 8 large eggs, lightly beaten 2 tsp vanilla essence 200g milk chocolate, cut into large chunks 200g white chocolate, cut into large chunks Method 1 Preheat the oven to 170ºC/325ºF/Gas Mark 3. 2 Line a baking tin approximately 33 x 23 x 5 cm with baking parchment. 3 Put the chocolate and butter in a large bowl, place over a pan of simmering water and allow to melt. 4 Sieve the flour and baking powder into a bowl and set aside. 5 Remove the melted chocolate from the heat and stir in the sugar. 6 Add the beaten eggs and vanilla essence. 7 Fold in the flour, and milk and white chocolate chunks. 8 Pour the chocolate mixture into the prepared baking tin. 9 Place in the oven and bake until the top feels firm, but the inside is still gooey when you insert a skewer. You don’t want to overcook, so check after 25 minutes, though it may take up to 35 minutes depending on your oven. 10 Cool in the tin, then remove and cut into squares. 23rd Mar 2009
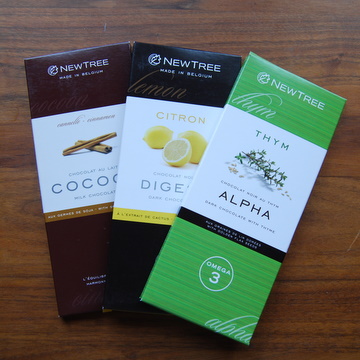
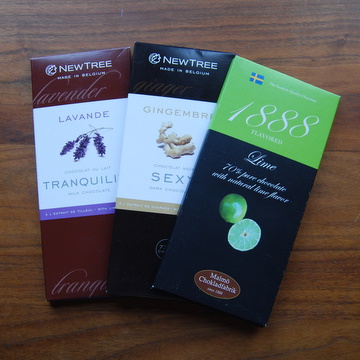
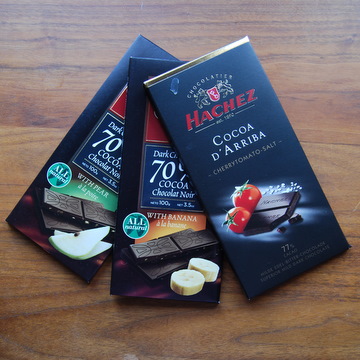
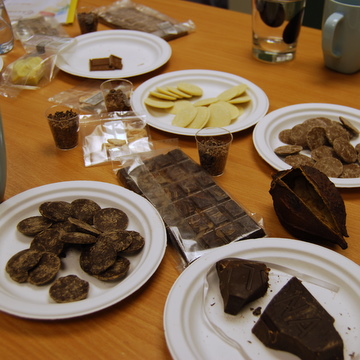
Tamsin: Our PTA is putting on a chocolate evening later this week and I have been busy collecting the necessary chocolate for various tasting stalls. One stall will have a selection of unusually flavoured chocolate bars for people to sample and guess the different flavours.
This is where having a husband who travels overseas quite often comes into its own. As a favour for me, and to add a little bit of colour to the usual business trip, he visited many different chocolate shops in several different countries to hunt down exotic flavours. We were surprised to find that the best collection of unusually flavoured chocolate bars came from a small shop in Finland.
Some flavours I can see would go well with chocolate such as cinnamon, lavender and ginger, but I am not so sure of lemon and lime. Orange and chocolate is a taste made in heaven but lemon could just be a bit too acidic for my tastes. Then there are the flavours, like thyme, that I'd usually use in savoury dishes, but which I can well believe would taste nice in a dark chocolate. Maybe the most unusual was the cherry tomato and sea salt – a dark chocolate with pieces of crystallised tomato hidden in its depths, leaving a surprisingly refreshing after taste.
Finally, although not a true ‘flavour’, I did find a fun ingredient that a small chocolate shop in Little Walsingham, Norfolk added to their ‘Popping Chocolate’. Once in the mouth this chocolate fizzled and popped thanks to a sprinkling of ‘Space Dust’, that nostalgic sweet that when sprinkled on the tongue causing a mini eruption in your mouth. A weird sensation back in my childhood days and one which was even weirder when experienced as an adult in a bite of chocolate.
6th Mar 2009
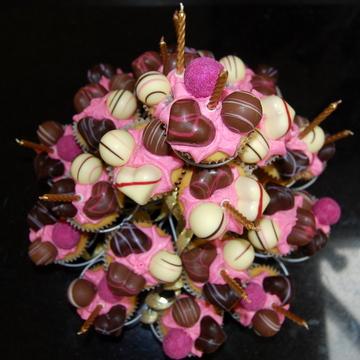
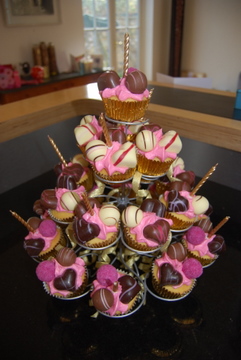
Tamsin: Life has been hectic and most of my spare time has been taken up with sorting out various birthdays and parties so I thought this week's blog could just be a peek at one of the results of my labours. I found a wire cup cake holder at Lakeland and created this for Carla's chocolate birthday party.
30th Apr 2008
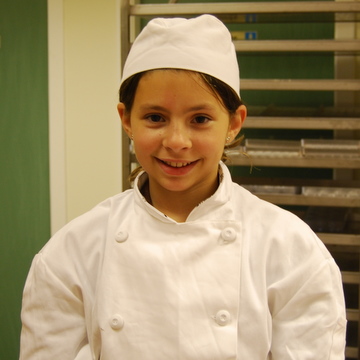
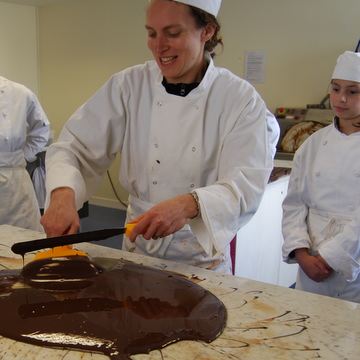
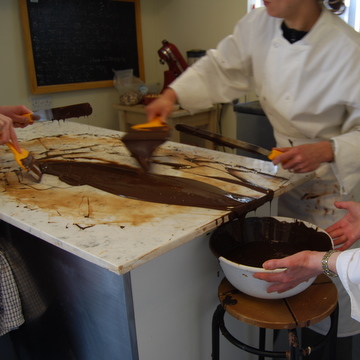
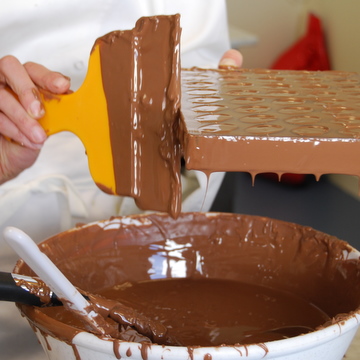
Tamsin: Last weekend Carla, my sister Joanna and I indulged ourselves wholeheartedly in chocolate. For one blissful Sunday we melted, poured, tasted, snapped, scrapped and messed about with it. This treat was provided by Coco Chocolate of Edinburgh, a small independent chocolate shop that provides a course for those of us with the chocolaty passion to learn the skills needed to produce wonderful chocolate.
The day began with a tasting and discussion on the history and origins of chocolate.
We then moved into the kitchen having changed into chefs' whites – very much needed when you saw the colour of them by the end of the day.
We first learnt how to temper chocolate – great fun, with plenty of action, elbow grease and pinpoint temperature readings.
Joanna did the best temper with the most shine and the best snap.
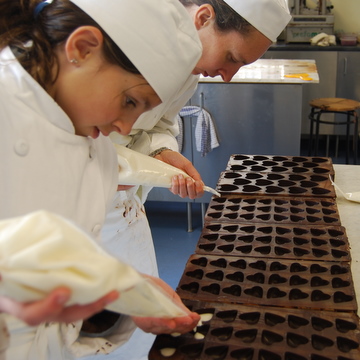
Moulds were filled.
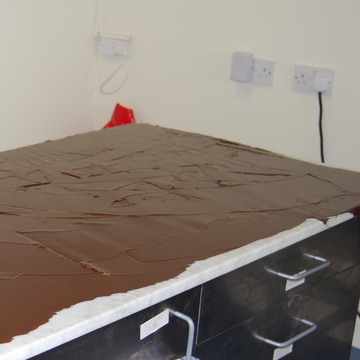
Mess was made.
Tables were covered.
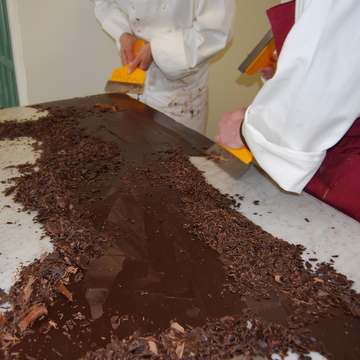
And then scrapped to make chocolate flakes for drinking chocolate.
Chocolate cases were filled.
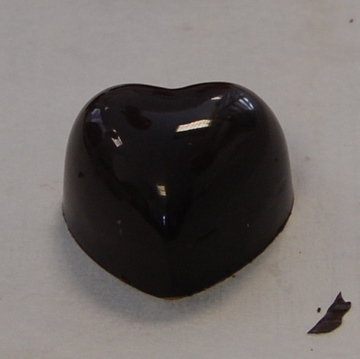
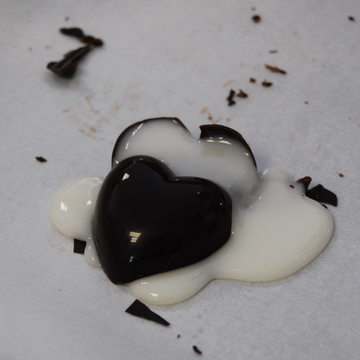
Glistening chocolate hearts turned out...
...some more successfully than others.
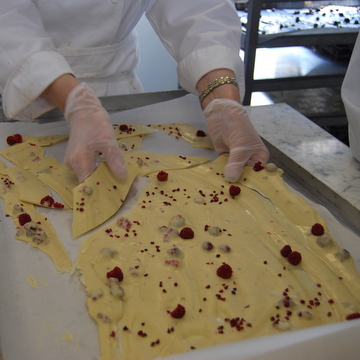
Other flavoured chocolate was snapped to give beautiful artisan-style pieces.
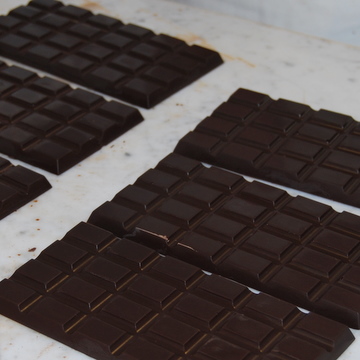
Bars of dark shiny chocolate stacked up on the table like gold bullions.
My favourite is the Rose and Black Pepper Chocolate that Coco Chocolate produces. Eaten as a bar or drunk as hot chocolate, it is delicious.
The day – it was bliss. 24th Feb 2008
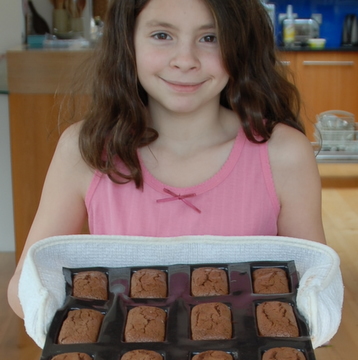
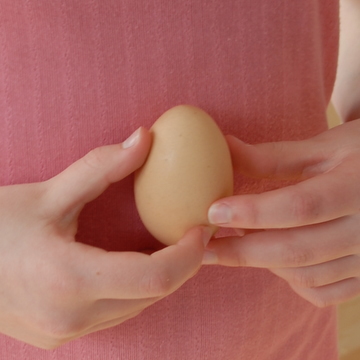
Carla: One week I was quite ill. I had been home for a couple of days and was beginning to get bored. So I got up from the TV and went over to the kitchen to find a cookery book. I found Nigella Express by Nigella Lawson. I love chocolate so looked through the chocolate index hoping to find a chocolaty thing. I found the flourless chocolate brownies which looked yummy.
Mum had to go out to get some of the ingredients and then I was ready to make it. While we were making it we found a very pointy egg that looked like a nose.
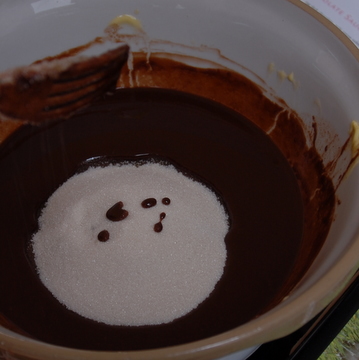
I also liked seeing the white sugar on top of the chocolate and you could make pictures by dribbling swirls of chocolate mix over it – the results should have been in the Tate Gallery.
When I finished making them, as well as the chocolate sauce that went with them, it was time for my brother to come home from school with some of his friends. I put all the brownies on one plate and they all had one. Joe especially enjoyed them and kept stealing them throughout the rest of the evening, so I had to make them all over again the next day.
Tamsin: Nigella Express was a cook book that I was given for Christmas. One of Joe’s friends asked me if I had used it yet. My reply was ‘I haven't yet as I've been too busy’, to which he rightly replied: ‘That’s slightly ironic!’
13th Jan 2008
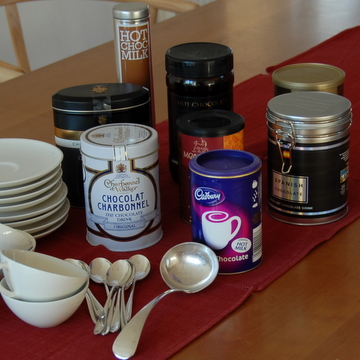
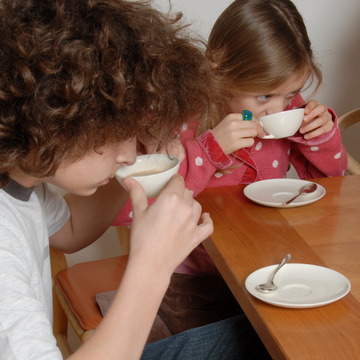
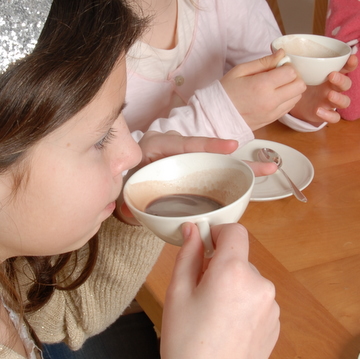
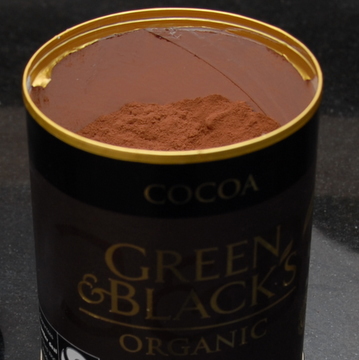
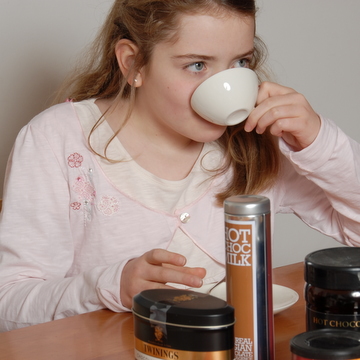
Jane: After a winter walk, what everybody in our house wants is a big steaming mug of hot chocolate. Trouble is we can’t agree on one we all like. At the moment, we’re ploughing through a huge pot of Green & Blacks which I find milky and cloying but the kids happily quaff. Tamsin and I were talking about whether there was such a thing as the perfect cup of hot chocolate and decided to find out by doing a taste test, with adults and children giving marks out of five for a variety of brands from Cadbury’s to Chocolat Charbonnel, which looks gorgeous in its chunky tin but tastes... well, read on…
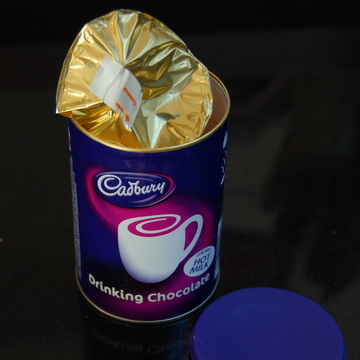
We tried out eight types, some new, some old favourites, all from the local supermarket. We followed the instructions on the box so the taste was exactly as the makers wanted. The testers were four outspoken children and three adults, and we gave each hot chocolate marks out of five – so the total any brand could get was 35. It quickly became clear we had entirely different tastes: what the kids loved, the grown-ups found overwhelmingly sweet and sickly. Our first baseline test (bringing back childhood memories) was Cadbury’s Drinking Chocolate. The kids loved it – it scored 19 out of a possible 20 from them – but the adults now found it ‘horribly sweet’ and gave it 6.5 points out of a possible 15. Grand total 25.5.
Then came upmarket Chocolat Charbonnel, twice the price and apparently consisting of flakes of ‘real chocolate’ which you mix to a paste with water before adding hot milk. Kids? ‘Urgh, it’s horrible, not a nice smell’ and ‘Yuk’ were typical. The adults liked it better, though weren’t bowled over. Total 15.5. Which just goes to show that money doesn’t necessarily buy you taste.
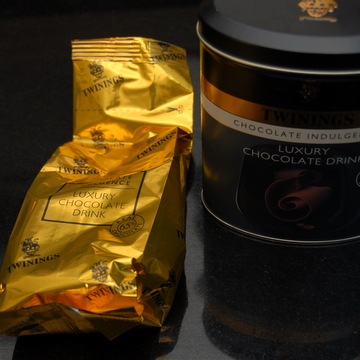
Twinings Luxury Chocolate Drink: this was a moderate hit with the adults having a rich, dark and slightly bitter tang, but the kids found it ‘too bitter, too dark’. Grand total: 16 out of 35.
Green & Blacks: we thought this would be all-round hit (it must be the trendy organic marketing campaign), but although the kids found it more than drinkable (16 out of 20), the adults were underwhelmed: ‘Grey, too weak and milky’. Total: 23 out of a possible 35.
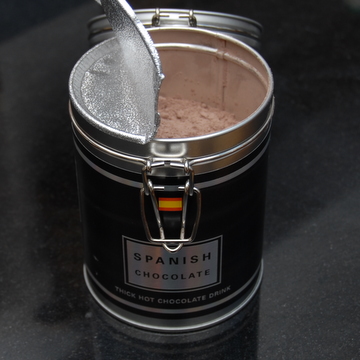
Spanish Chocolate came in a snazzy metal-flip tin and was a surprise success: its spicy cinnamon and cloves tang gave a rich complex taste in the mouth. Only Mike was less keen, damning it as: ‘Bread sauce’. Still, it got the highest overall score so far at 28 (out of 35). Good going!
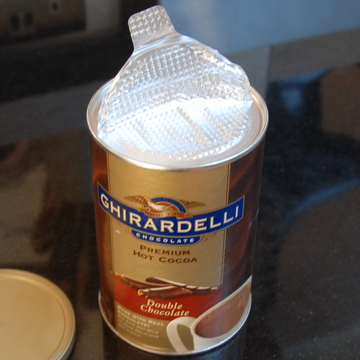
Ghirardelli Premium Hot Chocolate was another unknown brand: the kids loved it (20 out of 20); the adults were more reticent – ‘supasweet and powdery’. Total: 24.
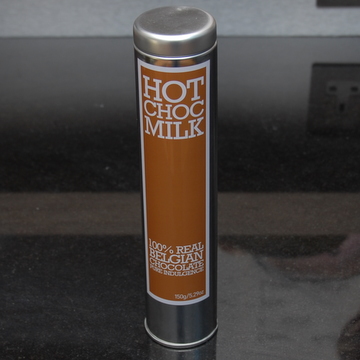
Hot Choc Milk is packaged in a tall, trendy metal tin full of ‘100% real Belgian chocolate’ and as it was the most expensive of the lot we were expecting manna. It looked like real chocolate, it melted like real chocolate, and three of the kids loved it. The other spat it out giving it ‘zero, I can’t finish this’ and the adults also found it gruesome: ‘Greasy, sickly, fatty, just disgusting. Absolutely no way would I buy this again.’ 16 out of 35.
Finally, we tried pure cocoa itself, Green & Black’s organic cocoa. Unlike all the rest, this doesn’t have sugar in it, so we added one teaspoon to every teaspoon of cocoa. It wasn’t sweet enough, so everyone put in more to their own taste. The verdict overall was good: it was easily my favourite, with a rich, full-bodied flavour. In total, the adults gave it 10, their highest score yet, and the kids 8. Grand total: 28.
Overall favourites:
First equal: Spanish Chocolate and pure Cocoa (both 28 points) Third: Cadbury’s Drinking Chocolate (25.5 points) Worst: Chocolat Charbonnel pleased no-one (15.5 points) But it was fascinating how different kids' and adults' tastes are: Kids’ favourites: First equal: Spanish Chocolate and Ghirardelli Premium Hot Chocolate with 20 points each. Third: Cocoa (18) Worst: equal Chocolat Charbonnel and Twinings Luxury (both 7) Adults’ favourites: First: Cocoa (10) Second: Twinings Luxury (9) Third: Spanish Chocolate (8) Worst: Hot Choc Milk (2) Final verdict: if you want a hot chocolate that everyone in the family will enjoy, try pure cocoa, and add your own sugar to taste. 3rd Jan 2008
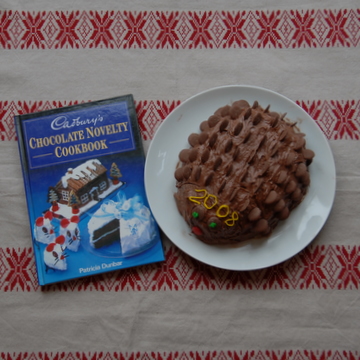
Carla: The Hedgehog.
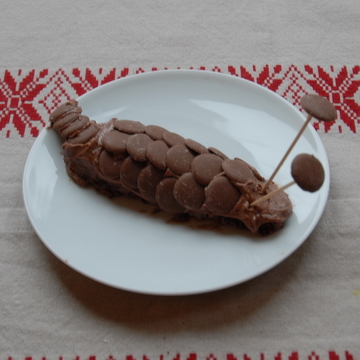
Joe: The Armadillo Thing (my mum thought was a slug!) As I wandered around the house looking for food I stumbled into the kitchen and came across Carla and Emma making a hedgehog cake. I sidled over to ‘borrow’ a slice they weren’t using but upon seeing what they’d made I thought I’d have a go myself. My first idea was to construct a dolphin with the help of their delicious icing but I then veered off in a completely different direction. The new idea started out as an armadillo but once I had plated its back with chocolate buttons like scales I realised that I had run out of buttons and the rest of the cake was in crumbs. Thwarted, I had to make do with the final two buttons stuck on cocktail sticks like big googly eyes.
Other ideas: snail, lizard, ladybird, fish.
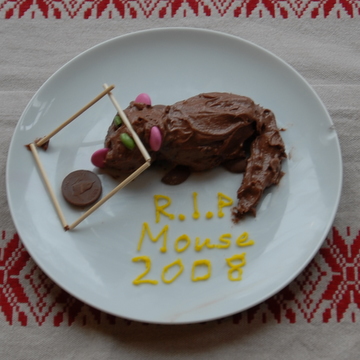
Helen (Godmother): Making an Effigy of a Dead Mouse in a Mousetrap out of Chocolate-related Materials
I always find when spending time with my godchildren that working in close proximity to chocolate is a successful activity, especially if it becomes necessary to get all of your fingers covered in chocolate. This New Year's Day, Carla chose to make a special celebratory hedgehog cake and I was very keen to join in. I noticed there were some significant cake trimmings left over to play with. And I knew that assembling heads and bodies and sticking them together with chocolate icing would allow me an excuse to dip my fingers in the yummy bowl of sculpting material. The most obvious candidates to accompany the hedgehog were a squirrel or a mole from the woodland habitat we can see outside the window. However, this holiday there has been an invasion from the rodent world. Mice have tunnelled in from outside and their visits have made a mess of the food stored in the lower levels of the larder. My idea was to commemorate the relationship of the human to the mouse, especially apt in chocolate form because Mike has been capturing the invaders with mousetraps using chocolate as bait. As I, my goddaughter and the mouse world all have a love of chocolate in common, we agreed that making a sculpture of a mouse in a trap would be a great way to remember this holiday. We decided to make the mouse out of a small amount of cake and a large amount of icing. We started with a clean china plate. I cut a small cube of cake for the body and covered it lavishly with icing and Carla stuck a smaller cube of cake on for the mouse head, glueing it on with icing. We put it in the fridge to set for five minutes.
Meantime, Carla chose pink Smarties for the ears and nose, and green Smarties for the eyes, so I cut these in half for her on a wooden chopping board. Several other Smarties were sampled in the selection process – it is very important to taste the materials you are working with to make sure you have the correct ingredients. Next we cut about 20 chocolate buttons in half to use for the legs. It turned out that we only needed four half buttons, so the other 36 half buttons had to be eaten to leave the chopping board neat and tidy for the next user.
The tail was sculpted out of icing when it came out of the fridge, and Mike built the outline of the trap over the forehead of our mouse, using four cocktail sticks stuck together with icing to glue it to the plate. Joe experimented with cherry skin and frozen cranberry juice to make some fake blood to stick on the forehead of the mouse. We rejected these interventions on grounds of sick taste. Lastly, Carla carefully chose the label wording for the recently deceased mouse effigy, and elegantly wrote ‘R.I.P. MOUSE 2008’ in yellow icing.
We consider our work a great success and a fitting memorial that would be submitted for the next Turner prize competition - if it had not been eaten at teatime. 6th Nov 2007
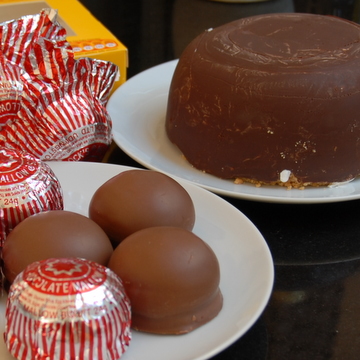
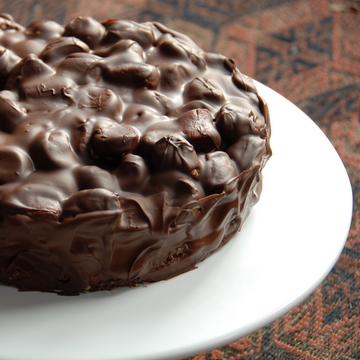
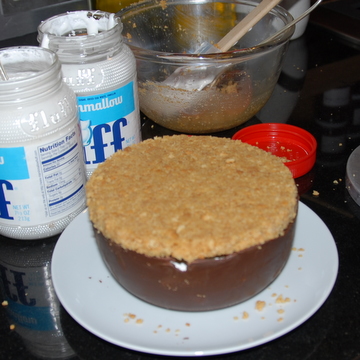
Tamsin: I like a challenge and Nicky has just given me an extra-large one (see her comment on October 26th blog) – could I make a giant teacake? The kids thought this was a great idea since the basic ingredients are marshmallow, biscuit and chocolate. This was a challenge the whole family would enjoy – or at least the results.
My first attempt could only be called ‘essence of teacake’. Very quick to make, it basically meant piling marshmallows on to a base of biscuit crust and covering it with chocolate. Jam is an optional layer depending on your memories of a teacake. This went down very well at afternoon tea but despite their culinary enjoyment, the critics were harsh. The shape did not put them in mind of a teacake and the middle was little bits of marshmallow rather than a mass of fluffy goo. The challenge continued ...
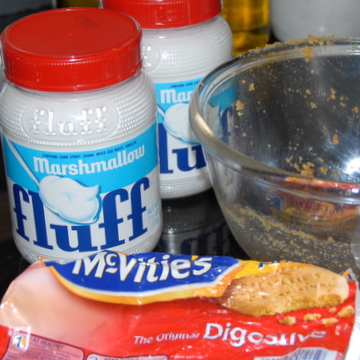
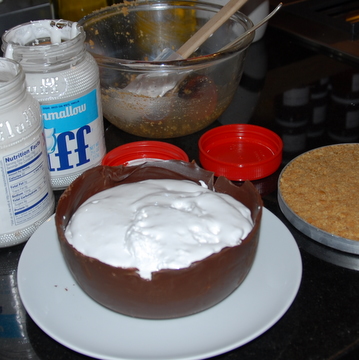
In the back of my mind I remembered seeing jars of marshmallow at the deli and sure enough you can buy such stuff called ‘Fluff’. Now all I needed was to build a dome shape of chocolate – and I suddenly thought of the ice-cream bombe mould buried in one of my cupboards. But is there a way to paint on melted chocolate and then remove it whole from the mould? As a first attempt, I lined the mould with cling-film. Mike expressed doubt at this method and he was right – there is no way you can spread chocolate on cling-film without it moving and sticking to itself. Retrieving as much chocolate as I could, I went for method two: greasing the mould with butter and painting the chocolate straight on. This worked, but I knew that getting the chocolate out of the mould would be tricky. Freezing it, then dipping the mould in hot water didn’t work, but putting it in the fridge until semi-hard and loosening the chocolate with a knife around the edges did.
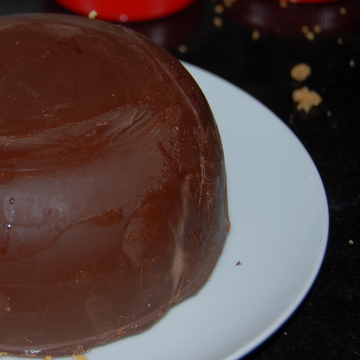
Great joy. My challenge was nearly over. As I filled the centre with Fluff, the odd crack appeared in the chocolate and began to get alarmingly bigger as I placed the biscuit crust on top.
But I quickly turned it the right way up, popped it in the fridge for a bit and voila! One giant teacake. Hopefully, the critics will be less harsh with this effort. Now we only have to work out how to eat it.
17th Oct 2007
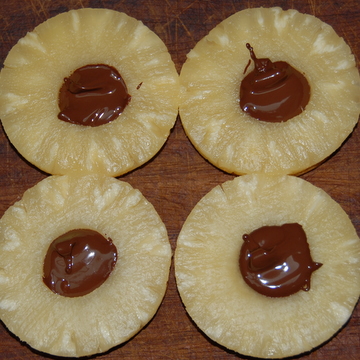
Mike: These are a childhood favourite of mine and I have managed to add them to Joe and Carla’s list of favourite puddings. Just pineapple rings, digestive biscuits and melted chocolate. They’re called ‘workies’, why I don’t fully know but it has something to do with my father eating them at work – either as a pudding served up at his canteen at Tate & Lyle (in the days when everyone stopped for a big cooked lunch in the middle of the day) or as a dessert at a works ‘do’ he and my mother attended.
There are a few important things to remember when making workies. Firstly, you must drain the pineapple on kitchen paper and pat each circle dry before placing it on the digestive biscuit. It is amazing what a perfect fit a pineapple ring and a digestive biscuit are – they were made for each other, edges matching edges giving you a smooth plane to smother in melted chocolate. Secondly, you need to make sure that the melted chocolate completely fills the hole in the centre of the pineapple ring.
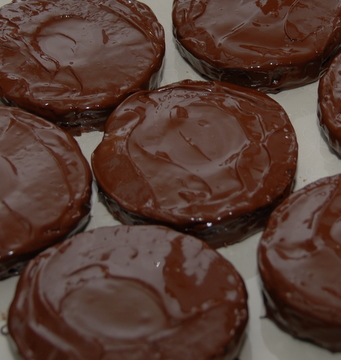
Then spread the chocolate over the top and finally around the sides so you completely seal in the pineapple. This can be a bit of a messy business but if you form a tripod with your fingers and thumb, you can balance the workie nicely on top.
There is then the question of how to eat them. Some people bite away in a random fashion while others nibble systematically at the sides until they are left with a last satisfying bite of ‘workies’ centre – pure chocolate and digestive. Workies will keep in a tin for a couple of days, but with grown men and children around it’s more likely the plate will be emptied on the day they’re made.
13th Apr 2007
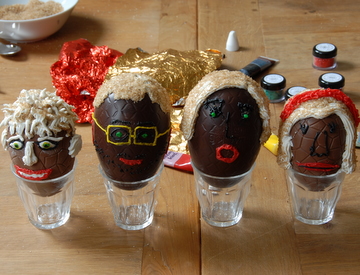
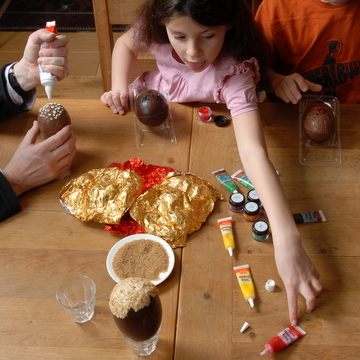
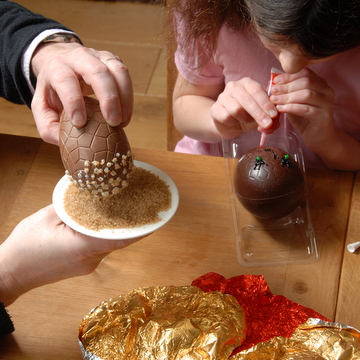
Five days after Easter and I'm looking at a heck of a lot of chocolate and I want to do something with it (apart from eating it) before Carla has a chance of demolishing it.
So Tamsin suggests a family faces competition. Sounds cool huh? So this is what it is; first we got four of our chocolate eggs (one each) then decorated them as each other with coloured icing, easy.
My hair, nicknamed The Bush (thanks dad) was made by dipping the icing in Demerara sugar (brown stuff). They look good and it's something different to do with your chocolate eggs (before eating them of course). Joe |

|