|
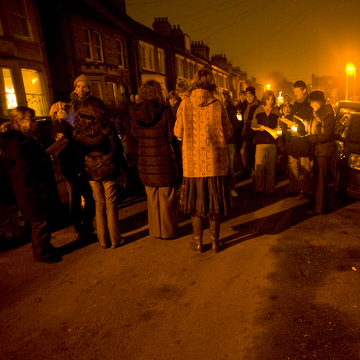
21st Dec 2008
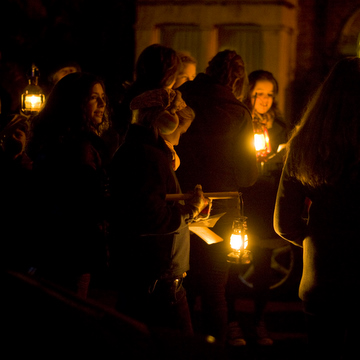
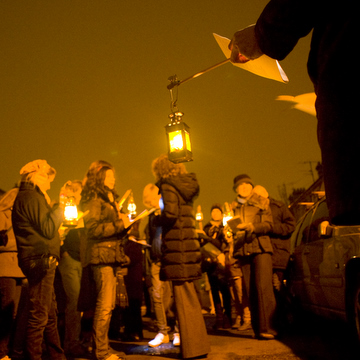
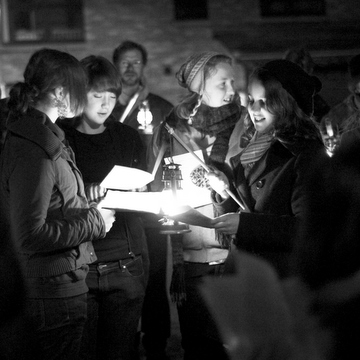
Tamsin: We have been carol singing round our local neighbourhood for about nine years. The rendition of Jingle Bells is just as loud as it was in the beginning but now has a deep bass to it as the boys' voices turn into men’s. Carol singing has firmly become a family and friends' tradition (one friend rang me in October to get the date so she could make sure she was not having to work).
The best day of the week to sing is Sunday. We have tried various other days but found that this is the one when most people are in and there are only a few cars around which means we can take over the whole road.
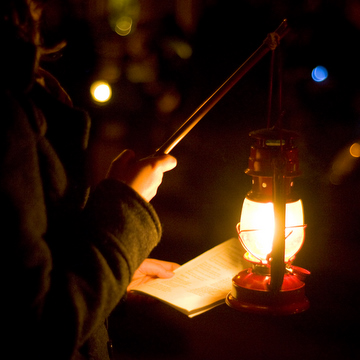
We have a self-made booklet with all the song words in and take lanterns or bicycle lights to read them by. There is a mixture of the traditional carols with more ‘fun’ Christmas songs. I have a love of the ancient ones such as ‘The Boar's Head’ and ‘Wassail, Wassail, All Over the Town’.
The evening begins with a hotdog and warming drinks to lubricate the vocal cords. We then pile out into the street and gradually sing our way down it. We always start with ‘Jingle Bells’ and end with ‘Winter Wonderland’ as we stride back home. Once in the warm, where our toes and fingers begin to defrost, we ladle out mulled wine and delve into a table of sweet treats.
We always raise money for a small local charity, this year Red2Green, and usually make about £100. That is a nice reward but there is nothing as rewarding as singing out in the cold, at the top of your voice with a group of friends. It really is the beginning of the festive season for me. This year I was lucky enough to have the nephew of a friend - Oram Dannreuther – who is a fashion photographer in France and happened to have a new camera that he wanted to try out. What better way for him to be introduced to the English carol singing tradition than coming along as our ‘official’ photographer to give me a lovely record of this event. I can only encourage others to try it in their neighbourhood but be warned – once begun it is hard not to make carol singing a tradition of your Christmas.
17th Dec 2008
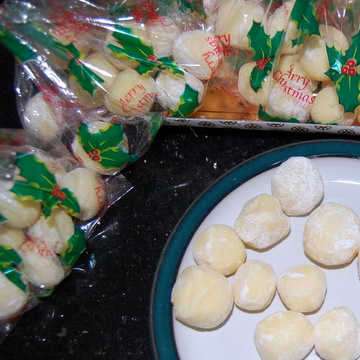
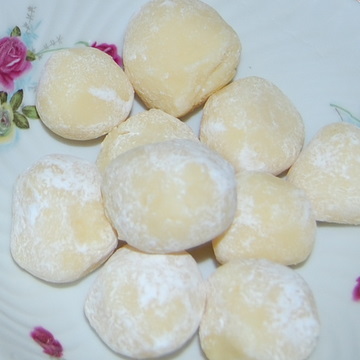
Jane: Easy, delicious white chocolate truffles made by my friend Sue – pack them into Christmas bags or decorated boxes and they make a fantastic home-made present for teachers, relatives, as a house party gift etc.
25g unsalted butter
Small tub double cream Few drops vanilla extract 225g good-quality white chocolate, finely chopped 50g desiccated coconut or icing sugar for rolling In a pan, melt the butter and double cream together gently, then add the vanilla. Add the white chocolate pieces and beat to a smooth paste. Leave the mixture to cool in the fridge for two to three hours, stirring occasionally to ensure it is smooth. Once it’s set enough, roll into little balls and coat with desiccated coconut or icing sugar. Place in a bag or box, and store in the fridge until needed. Will keep for several days. 15th Dec 2008
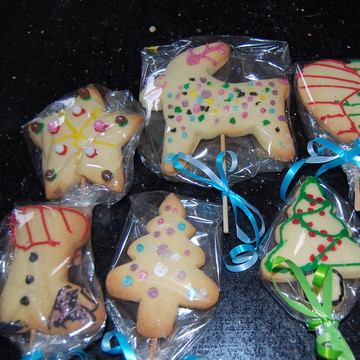
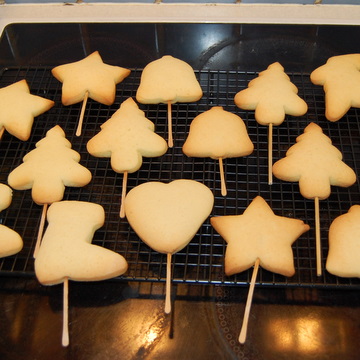
Jane: This is the week when we all run around trying to find fresh inspiration for Christmas gifts to give the teachers before term breaks up on Friday. Last weekend I read a newspaper article talking to teachers about the thorny subject of getting 30 naff Christmas gifts from their class - they cheerfully said they appreciate home-made stuff a lot more than mugs or plaques saying toe-curling things like ‘world’s best teacher’. Which is great, because home-made it’s going to be. This year, as well as the bath bombs, we’re mostly going to be giving Christmas biscuit lollypops. They look fantastic, taste delicious, are easy to make in bulk, and the children can unleash their creative side while decorating them, which makes them very personal.
You need good, buttery-tasting cookies which also hold their shape while cooking: we used a recipe from Nigella’s Domestic Goddess (see below) but any old favourite you know that creates solid cookies will do. Cut out the biscuits a little thicker than normal – about three-quarters to one centimetre thick – using Christmas cutter shapes like trees, stars, Santa’s boots, reindeers, bells etc. Before putting the biscuits in the oven, push a small but solid wooden stick (cut-off kebab skewers work well – cocktail sticks are a bit too flimsy and traditional lollipop sticks too big) through the middle of the biscuit, then cook for a couple of minutes longer than usual.
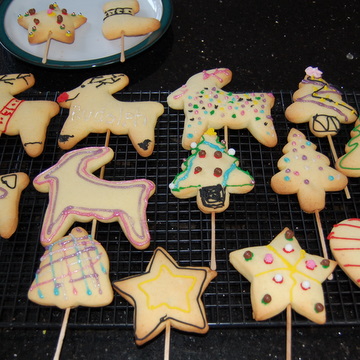
When they’re cool, the children can get to work with the decorating – we used bought, brightly coloured icing pens because they’re easy, but you can make your own icing if you prefer. Then leave the biscuits to dry. They look great wrapped in cellophane with a ribbon and a little handwritten tag, proving it’s not just the thought but also the effort that counts.
Good-shaped Cookie Recipe
This makes 30 or so biscuits 175g unsalted butter 200g caster sugar 2 large eggs 1 tsp vanilla extract 400g plain flour 1 tsp baking powder 1 tsp salt Cream the butter and sugar until pale and fluffy, beat in eggs and vanilla extract. Mix the flour, baking powder and salt in another bowl, then add the dry ingredients to the butter mixture, mixing well to make a dough. Divide dough into two balls, wrap each in cling-film and place in the fridge for at least an hour (you can freeze one half for use later). Roll out on a floured board to about ¾ to 1 centimetre thick, and cut out in seasonal shapes. Place a wooden stick carefully into each biscuit, then lay on a baking sheet covered with lightly floured greaseproof paper, and cook at 180ºC for about 10 to 14 minutes. When cool, decorate as above. 6th Dec 2008
Jane: I
was digging around my parents’ Christmas decoration box recently and came
across an old, homemade Hanging Santa. He was always a real family favourite, strung
up from a hook in the middle of the hall corridor so he kicked everyone in the
eye every time they passed (funny how no one thought of putting him anywhere
more convenient). Twenty years on, he was looking a little ragged around the
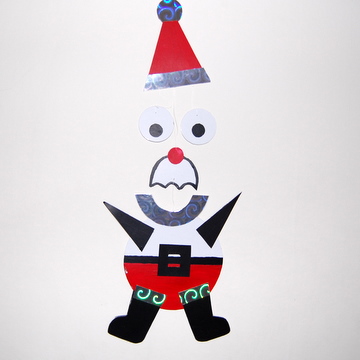
edges, so I decided to make him afresh for Xmas 2008. And here he is, looking
very sparkly and chipper, raring to go for some chimney action come the 25th.
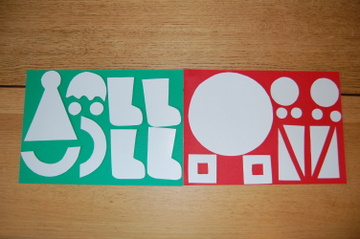
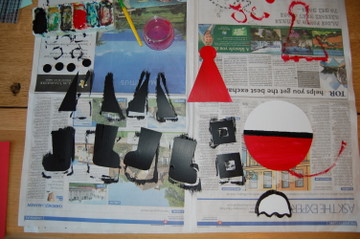
Hanging Santa is easy to make, once you’ve cut out the shapes, but he does take a bit of faffing-around time to let paint dry etc. All you need (that famous phrase) is a piece of white cardboard, some zany metallic card for decoration (or use cotton wool instead), black and red paints, glue, a needle and white thread. First draw
and cut out the shapes from the white cardboard: a big circular body; four
boots (you stick two sides together); four triangular arms (ditto); one
moustache; two large circular eyes; four small pupils; two belt buckles; one
hat with a pompom shape on top; two small circles for the nose; and two half
moon collars.
Then get
out the paints: paint the boots, buckles, four pupils and arms black. Paint the
hat red on both sides. Paint the body half red, and paint a black belt line, on
both sides. Paint a black edge around the moustache, on both sides.
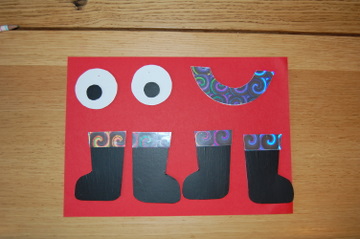
Once all this has dried, take your zany metallic card and cut out four tops for the boots, stick on with glue. Cut out two metallic circles to fit the collars. Stick a black pupil on to each side of the two eyes. Stick the two red noses on top of the moustache, one each side. Cut out
two metallic circular pompoms for the hat. Thread a double piece of thread
through the original pompom, tie fast – this will be the thread your Santa
hangs from. Then stick the zany metallic pompoms over each side to cover.
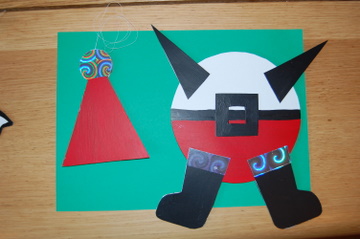
Now you
can build the Santa. Stick a boot on each side of the body, fitting them
together neatly as shown. Repeat on the other side. Do the same with the arms.
Stick a buckle on each side of the body over the belt line. Then stick
the two plain collars together over the body. Using a needle and thread, make a
hole in the centre of the collar (where it overlaps the body) and tie fast one
end of the thread. With the other end of the thread, make a hole in the bottom
of the moustache, and tie fast at the required length. Stick the two metallic
collars on top of the plain collar, one on each side of the body, to cover the
thread hole.
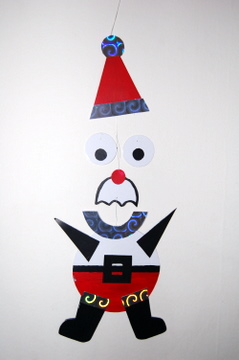
In the
centre of the red nose, make another hole with the needle and thread and tie
fast. Attach the other end of the thread to the middle brim of the hat (about
1cm in). Tie fast at required length. Now hang the two eyes from the hat brim
with thread, and tie fast. Stick over two lengths of metallic card on the hat
brim, to cover the holes. And there
you have him – a Hanging Santa. Okay, mine looks like a gormless Homer Simpson
(it’s the moustache) though he’s still rather cute, breezing around happily
on the wall. 2nd Dec 2008
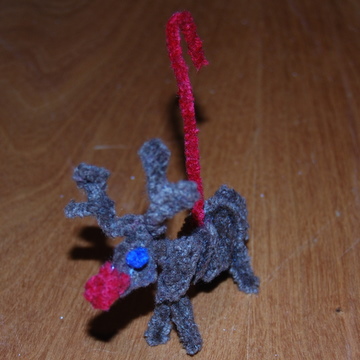
Tamsin: Yesterday I had two droopy children lying on my sofa – my daughter, Carla and her friend, Harriet – both had come down with colds. There is only so much TV watching that can be done, even in this state, and by the afternoon an activity was needed – something not too strenuous or taxing on the brain.
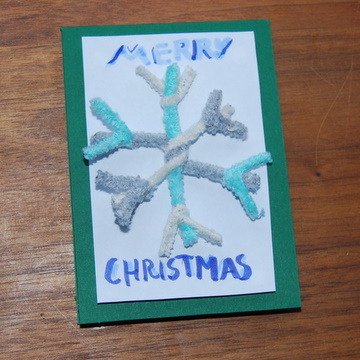
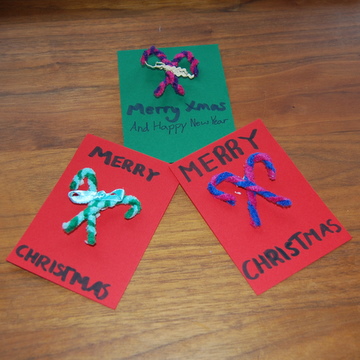
I had just bought a set of 1,000 coloured pipe cleaners (actually I bought 2,000 but had half left) and with the clock ticking towards Christmas suggested they make some creative Christmas cards.
It is very easy to twist two pipe cleaners together and create a rather good ‘candy cane’. These can then be attached to cards or hung on trees as decorations. I am going to ask my nieces and nephew to make a whole load of them when they come to stay, and hang them as ‘paper chains’ above the dining room table.
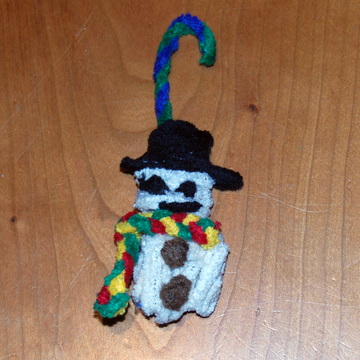
Harriet then took the idea further and began to make fantastic tree decorations by bending and twisting pipe cleaners, adding different colours as she went – starting at the head and working down. For eyes she poked and looped cut pipe cleaners through. Her first was the snowman...
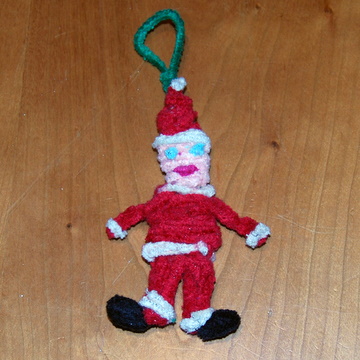
Then a Father Christmas ....
And finally a Rudolf.
|

|